KL18203 SS Benchy - Glycol - Bench Top Keg Dispenser 240V | User Guide
The Benchy Portable Keg Dispenser is the easiest way to setup a draft system. No ice required! Just plug in the keg and power and be pouring beers instantly.
Do you want a benchtop keg system that simply plugs into the wall, top up with water mixed with some glycol*, and is easy to use? Benchy is the easy to use bench top keg dispenser that makes draft beer as easy as flipping a switch. Perfect for weddings, catering or other functions where no complicated beer plumbing is necessary. It is as easy as: 1. Plug into wall 2. Add 20% Glycol/Water Solution 3. Attach Kegs and Gas 4. Wait up to 1 hour for resevoir to cool. 5. Pour!
Benchy Glycol | Warnings and Installation Checklist
Warning If the Benchy has just been moved do not turn on unless it has been standing for at least 24 hours. Failure to do so will void warranty. Stand the Benchy in an upright position for at least 24 hours before plugging inot the mains socket.
Warning Ensure there is at least 100mm clearance on each side of the Benchy to allow adequate airflow. Not allowing adequate ventilation will void warranty, reduce performance and increase power consumption.
Warning Perform a pressure test on all product lines prior to use
Warning Only use KegLand approved cleaners and sanitisers to clean the product lines
Warning Do not run the pump dry. Ensure the pump is always submerged when in operation. Running the pump dry will damage the pump
Let the Benchy sit for at least 24 hours after delivery or after sitting on its side before turning the unit on.
Whenever the Benchy is operating and cooling the reservoir the agitator pump needs to be operating to keep the liquid in the reservoir agitated and avoid ice formation. The pump is wired into the temperature controller and hence should always be running when the unit is turned on.
1 x KL18203 SS Benchy - Glycol 1 x Standard IEC Lead 2 x KL15523 & 1 x KL13161 1 x KL07672 1 x Sight Glass Assembly
Locate the Sight Glass bracket, mounting screws and Quick Swivel Connector o-ring inside the Benchy Glycol (open the hinged top flap). Install the 0-ring in the Quick Swivel Connector (as shown). Using the supplied screws, fasten the Sight Glass top bracket to the Benchy (as shown)
Once the o-ring and bracket are installed, thread the Quick Swivel Connector on to the bottom sight glass thread and insert the top of the sight glass through the top bracket as shown
Before attaching the Benchy Glycol to your keg first screw your taps onto the two shanks on the front of the Benchy and tighten the shank collar using the included or a
The FC Nukataps need to be quite tight against the shank in order to seal.
For easy connection of beer/product lines to the Benchy Glycol, we recommend installing KL06903 . These push fittings allow KL06231 to be used for product lines.
Once the KL06903 duotight fittings have been installed, push a length of KL06231 EVABarrier 5mm ID x 8mm into each fitting to serve as product line. The other end of the line will be fitted into a Ball Lock Disconnect (for Ball Lock Corny Kegs) or a Coupler (for commercial kegs)
It is essential to pressure test all product lines prior to running any liquid through them for dispensing.
The product lines need to be pressure tested to a pressure that is at least 1.5 times the pressure that will be used for dispensing to a maximum of 50psi. For example, if your dispensing pressure is 20 psi then your product lines should be pressure tested at 30 psi and your testing pressure shouldn’t exceed 50 psi.
The product lines can be leak tested via multiple methods which are outlined below. It is a good idea to test the system using multiple methods to be certain the system is holding pressure
Attach a duotight push in fitting to each product line shank ()
Push EVA Barrier hosing connected to a regulated pressure source into one of the duotight fittings
Set the pressure on the regulator to 1.5 times the dispensing pressure up to a maximum of 50 psi
Turn the gas cylinder off and leave to sit for a few hours. Then check if the pressure on the regulator has decreased from the set pressure
If the pressure has dropped double check that the leak isn’t occurring externally from the Benchy. Check all duotight connections and connections to your gas cylinder or regulator with a soapy solution to check for the formation of bubbles indicating a leak.
If the pressure remains stable then this product line has passed the leak test.
Perform the above Pressure Decay Test on the other product line.
Fill the reservoir with water
Screw a 8mm x 5/8” duotight fitting onto each all thread shank on the rear of the Benchy ()
Push EVA Barrier hosing connected to a regulated pressure source into one of the duotight fittings
Set the pressure on the regulator to 1.5 times the dispensing pressure up to a maximum of 50 psi
Empty the reservoir (if filled)
Screw a 8mm x 5/8” duotight fitting onto each all thread shank on the rear of the Benchy ()
Push EVA Barrier hosing connected to a regulated pressure source into one of the duotight fittings. The pressure of the water source can be regulated using a KL15035 for example or by connecting a keg full of water pressurised at 1.5 times the dispensing pressure up to a maximum of 50psi
Look for any leaks in the reservoir from the product lines.
Perform a cooling test on your system to ensure that all connections are water tight, the pumps are operational and the glycol chiller is chilling the reservoir correctly
With the Benchy unplugged fill the reservoir with water, ensuring that all cooling coils and the impeller of the agitator pump are submerged
Check for any signs of leaks around the exterior of the Benchy.
Plug the Benchy in using the provided IEC cable and turn the red power switch on
Set the temperature on the STC-1000 controller on the front of the Benchy to 2°C
NOTE: Refer here for the full
The system has now been tested for cooling and leaks and is ready to be used to chill a font or dispense from a keg (or both).
The Benchy can be operated with either just water in the reservoir or both water and glycol to reduce the freezing point of water.
For most use cases a glycol mix is greatly preferred as the cooling power of the Benchy will be much higher than if used with water alone. This is because the glycol lowers the freezing point so the reservoir can be set to -5°C or lower (depending on ambient, the water/glycol mix and other factors such as ABV of product)
IMPORTANT: If you are only using water in the reservoir and not glycol then do not set the temperature of the reservoir below 2°C
Always determine the freezing point of the beverage you are dispensing and use this as a lower limit for the reservoir set temperature to not exceed.
Ensure the impeller and the cooling coils are submerged before operating the G40.1
if the reservoir is filled with water set the reservoir temperature controller to 2°C. If using glycol solution the reservoir temperature can be set below 2°C according to the table below.
Ensure the cooling coils are submerged. The amount of glycol required to be added to the reservoir depends on the desired set temperature of the reservoir which is dependent on a number of factors including how many fermenters are being cooled, the ambient temperature the fermenters are in and heat ingress etc. Use the table below to determine what percentage of glycol you require.
The reservoir temeprature is controlled with the STC-1000 Temperature Controller.
To set the reservoir temperature:
Hold the ‘S’ button until F1 is displayed
Press ‘S’ again which will enter temperature adjustment mode
Then hold ‘S’ and up or down buttons simultaneously to adjust the set point temperature of the reservoir
Once the desired temperature has been entered, press and release the
NOTE: Refer here for the full
Do not set the Set Point Temperature of the reservoir below 2°C if using water (instead of a glycol solution) in the reservoir (AKA an icebank setup)
Refer to the below for recommended Set Point Temperatures with corresponding glycol percentage
You can measure the glycol percentage using a calibrated refractometer and comparing to the specific gravity at 21°C in the above table.
We would advise running a 20% glycol solution. The pump is not designed to be run with a glycol concentration higher than 30% hence it is not advised to exceed this glycol concentration. Doing so may damage the pump/impeller.
Look for bubbles forming in the reservoir which may indicate a leak from the product lines.
Perform the above Bubble Test on the remaining product line.
Repeat the test for the other product line.
Hold the ‘S’ button until F1 is displayed
Press ‘S’ again which will enter temperature adjustment mode
Then hold ‘S’ and up or down buttons simultaneously to adjust the set point temperature of the reservoir
Once the desired temperature has been entered, press and release the power key to save the parameter
Leave the Benchy on for 12 hours to ensure that it drops the temperature of the reservoir to the set temperature on the temperature controller
0
0.0°C
1.000
10
-3.3°C

1.006
20
-7.8°C
1.015
30
-13.3°C
1.024


Benchy Glycol | Setting Up The Benchy Glycol
The reservoir temeprature is controlled with the STC-1000 Temperature Controller.
To set the reservoir temperature:
Hold the ‘S’ button until F1 is displayed
Press ‘S’ again which will enter temperature adjustment mode
Then hold ‘S’ and up or down buttons simultaneously to adjust the set point temperature of the reservoir
Once the desired temperature has been entered, press and release the power key to save the parameter
NOTE: Refer here for the full
Do not set the Set Point Temperature of the reservoir below 2°C if using water (instead of a glycol solution) in the reservoir (AKA an icebank setup)
Before attaching the Benchy Glycol to your keg first screw your taps onto the two shanks on the front of the Benchy and tighten the shank collar using the included or a
The FC Nukataps need to be quite tight against the shank in order to seal.
After tightening your taps onto the shanks, you can then plumb your kegs in to the Benchy. On the back of the Benchy you will find two 5/8" BSP shanks. - we recommend KL06903 . Simply push 8mm OD EVABarrier tubing from your liquid ball lock disconnect or keg coupler into the fittings once installed. We recommend KL06231 for this.
Then attach the ball lock disconnect or keg coupler onto your liquid keg post or spear respectively.
Ensure that the EVABarrier hose is cut straight and cleanly with a Stanley knife or KL07689 . Then firmly push the EVABarrier hose into the opening of the bulkhead. Make sure that the hose is pushed in to its full depth. Then check for a good connection by gently pulling bank on the hose. If the hose comes out of the push in fitting, reinsert ensuring the hosing is pushed far enough into the fitting. NOTE: Gen 2 and later duotight fittings are marked to show correct insertion depth for EVABarrier tubing.
To remove EVABarrier hose from the push in fitting, simultaneously push the collet in while pulling the EVABarrier hose out of the push in fitting. Once the hose is removed cut the burred end off with a 2 in 1 tube cutter or Stanley knife to produce a clean straight cut.
A KL07672 can also be used to remove hosing from the push in fitting. Insert the tubing into the groove in the centre of the spanner and use the spanner to press in on the collet while pulling on the hose.
The other end of the KL06231 can then be connected to a liquid disconnect (for ) or the liquid Out of an , or Coupler (for commercial or brewery made beer).
Use this line to connect your kegged beer to the Benchy as below:
The pressure the regulator is set to will differ depending on the ambient temperature of the keg and the carbonation level.
As most kegs that are dispensed through a glycol chiller or similar system are not chilled, the dispensing pressure will normally be higher than the typical dispensing pressure for a short draw, chilled system such as a kegerator. The rule of thumb is that the higher the temperature of the beverage, the higher the CO2 pressure will need to be to ensure the beverage stays adequatley carbonated and does not foam excessively due to CO2 coing out of solution.
For most styles of beer, you should be aiming for a carbonation level of between 2.3-2.8 volumes of carbonation with the average carbonation level being 2.6 volumes (if you are unsure of the carbonation level of the beer i.e. if it is a commercial keg then assume it is at 2.6 volumes of carbonation).
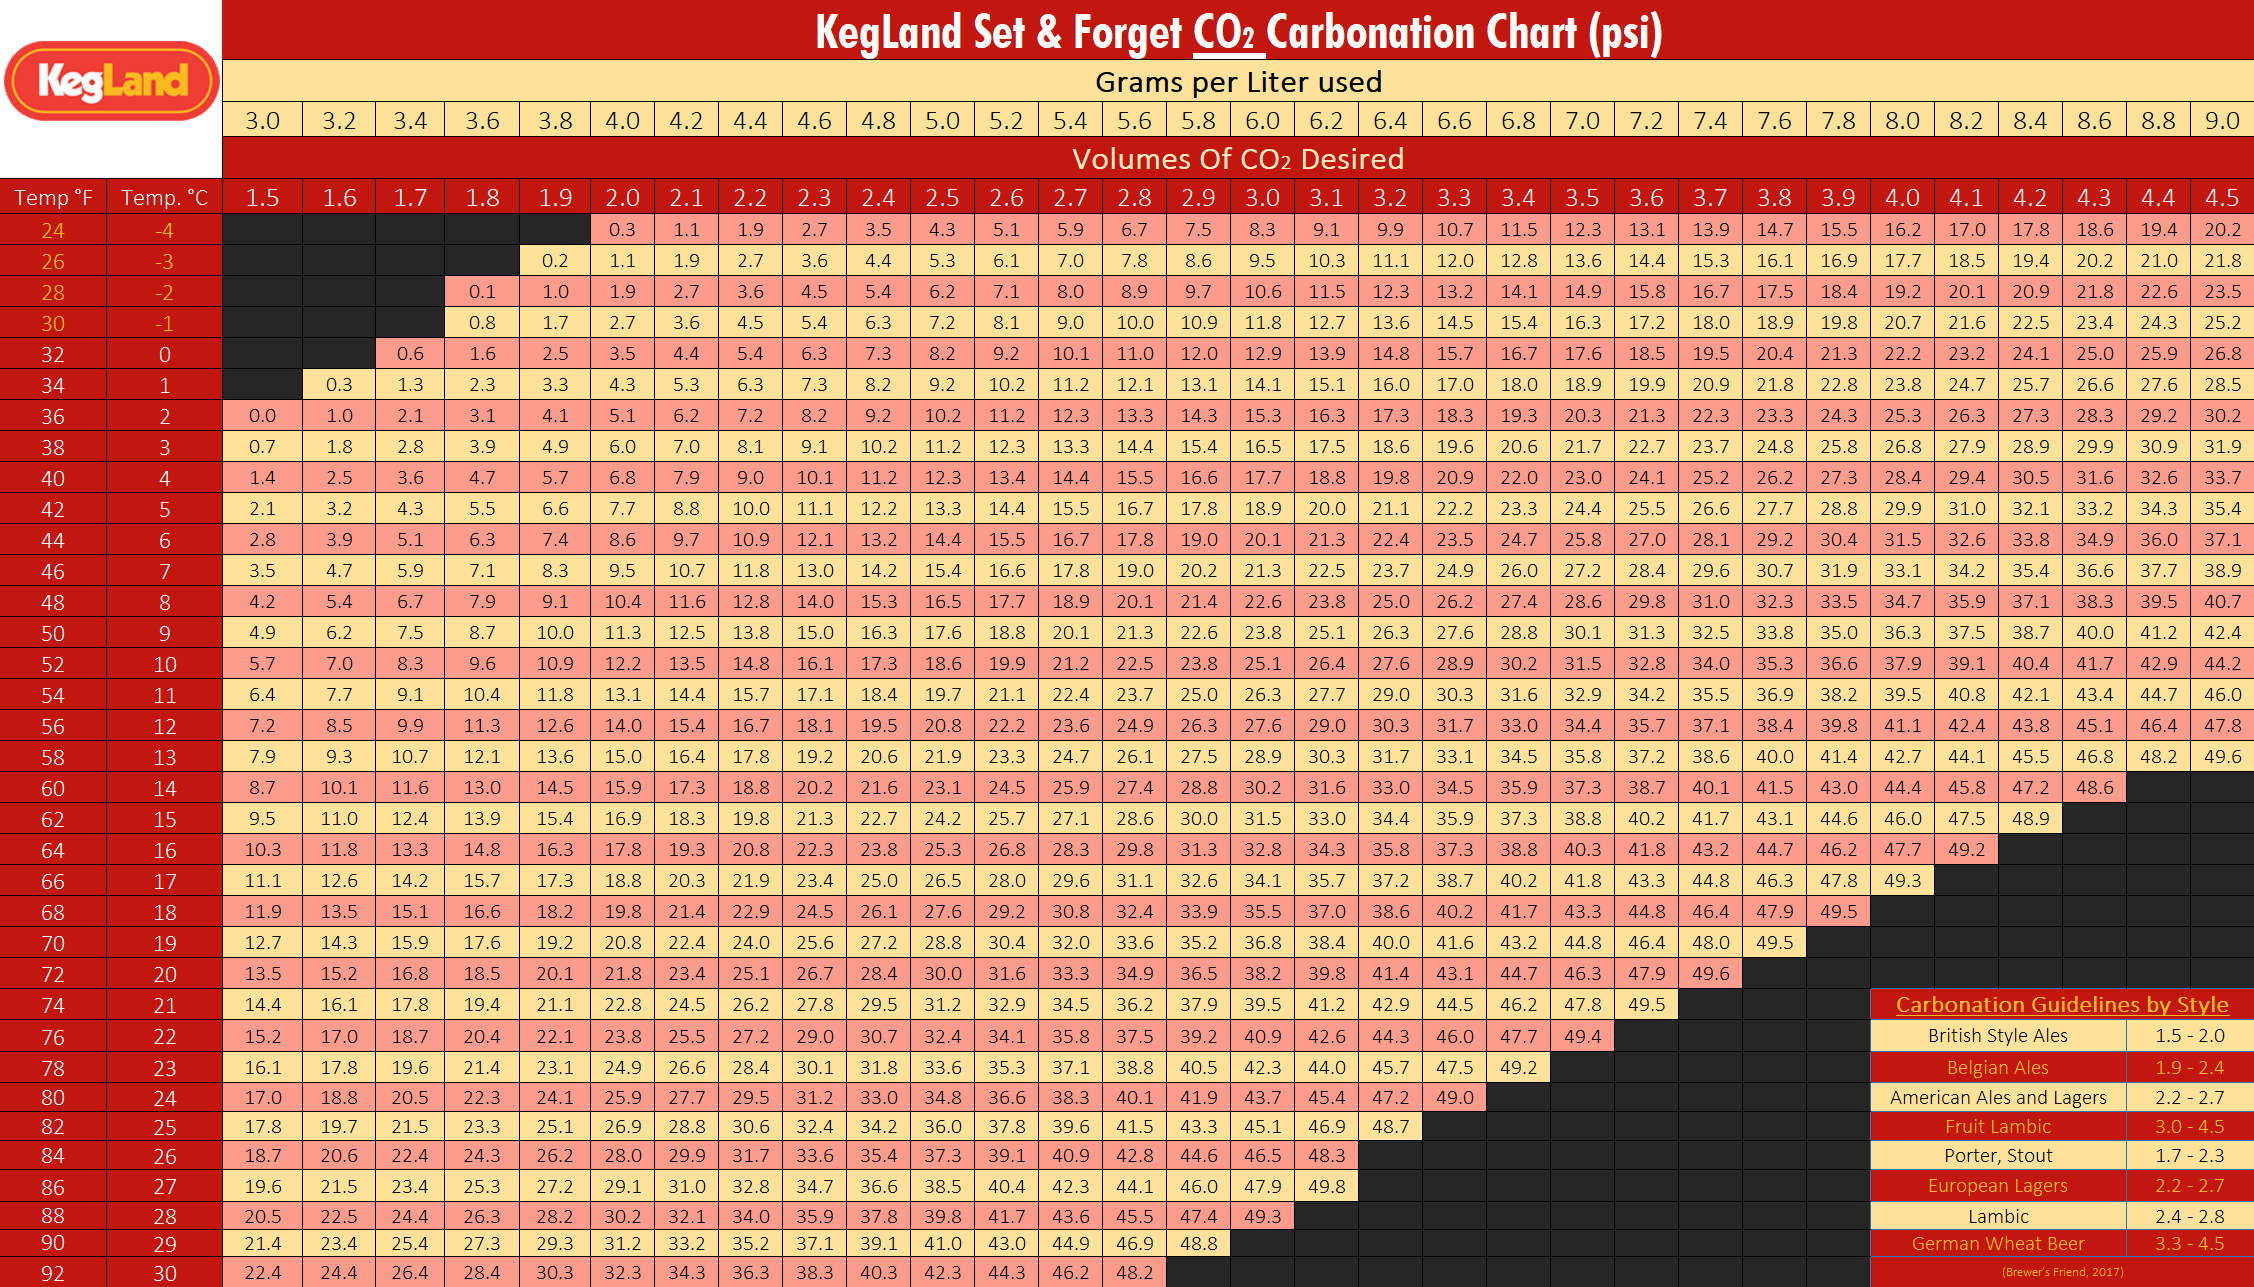
To achieve a specific carbonation level during carbonation or priming refer to the table in the link below and correlate the temperature of the keg with the desired carbonation level.
For example, if dispensing a standard ale at 2.6 volumes at 25°C ambient temperature, the pressure required to dispense would be ~34.7psi. Please note more or less pressure may be required due to other factors such as line length and diameter. It is always best to start at a lower than expected pressure and increase it if necessary.
NOTE: Do not try to fix a slow or fast pour rate by adjusting the dispensing pressure. The dispensing pressure should be adjust to suit the temperature and carbonation level of the keg.
Bubbles or foam in the beverage line between the keg and the Benchy are a good indication that the dispensing pressure is loo low.
Adjusting the dispensing pressure to control the flow speed will result in your beer either going flat or over carbonated. It is best to adjust the beverage line length and diameter.
If the pour is too fast and is producing a lot of froth then increase the length of the beverage line between the Benchy and the keg. Alternatively if the pour is too slow then decrease the length of the beverage line between the Benchy and the keg.
When adjusting your beverage line length to achieve the perfect pour it is always best to start with a longer length of beverage line as you can always trim a longer length of hose.
The included Flow Control NukaTaps can also be adjusted to increase or decrease the speed of the pour.
For most Benchy setups, KL06231 is recommended.
Wider diameter line may be required for very long runs.


Benchy Glycol | Troubleshooting & Maintenance
Benchy not reaching Set Point Temperature
Set Point may be incorrect
Check the and adjust if needed.
Only use KegLand approved cleaners such as and and sanitisers such as and to clean and sanitise your product lines.
An easy way to clean your product lines with a gas source is to use a KL20220 . Simply fill a PET bottle with correctly diluted Stellarclean or Stellaroxy solution. Hook up your liquid ball lock disconnect on your product line to the carbonation cap nad pump the line cleaning kit to push cleaner through the product lines.
The exterior of the Benchy Glycol should be cleaned with a mild detergent and a clean, lint free microfibre cloth.
Insufficient Clearance
A minimum of 100mm clearance is required on each side of the chiller to ensure adequate heat dissipation for the condensers. Move the unit into open space to improve cooling efficiency
Insufficient 'bounce back' time
The Benchy Glycol is able to chill about 20-30L of beer per hour
Beer too foamy/frothy
Insufficient CO2 pressure
The CO2 pressure generally needs to be set higher for a glycol setup to keep CO2 in solution. Refer and adjust
Incorrect Beer Line
KL06231 is recommended. Wider or narrower diameter line may cause pouring issues
Beer not cold enough
Lower the of the Benchy
Pouring too quickly
If the beverage is dispensing too quickly this can cause foaming and also flat beer. Refer and adjust
Beer not dispensing
Frozen Lines/Product
If the Benchy temperature is lower than the freezing point of the beverage then the product lines may freeze. Check the and adjust if needed.
Incorrect Check Valve Installation
If using a commercial coupler such as an or check the installation of the liquid check valve. If this is not corect the liquid flow will be blocked.
Incorrect Flow Control Adjustment
Check that the Flow Control is not set too low as this can prevent liquid from pouring.
No CO2/gas
If there is no headspace pressure in the keg it is not possible to dispense from the keg. Refill or replace the CO2 cylinder with a full one
Benchy Glycol | Technical Specifications
Refrigerant: r600a (80 grams)
Cooling Capacity: 45L per hour (approx)
Reservoir: 16L
Climate Class: SN, N, ST, T
Rated Voltage: 220-240V
Rated Current: 0.9A
Rated Frequency: 50Hz
3530 L x 340 W x 470 H (mm) - Including duotight sight fill level tubing
600 L x 340 W x 470 H (mm) - Including NukaTaps
(Suitable for): KL06903 - (recommended) KL06910 - KL00840 - KL04916 -